Getting Started8 min read
What's Inside Your Print? A Beginner's Guide to 3D Printing Infills
Not solid plastic all the way through — infill shapes the strength, weight and cost of every print. Here's how Grid and Gyroid compare.
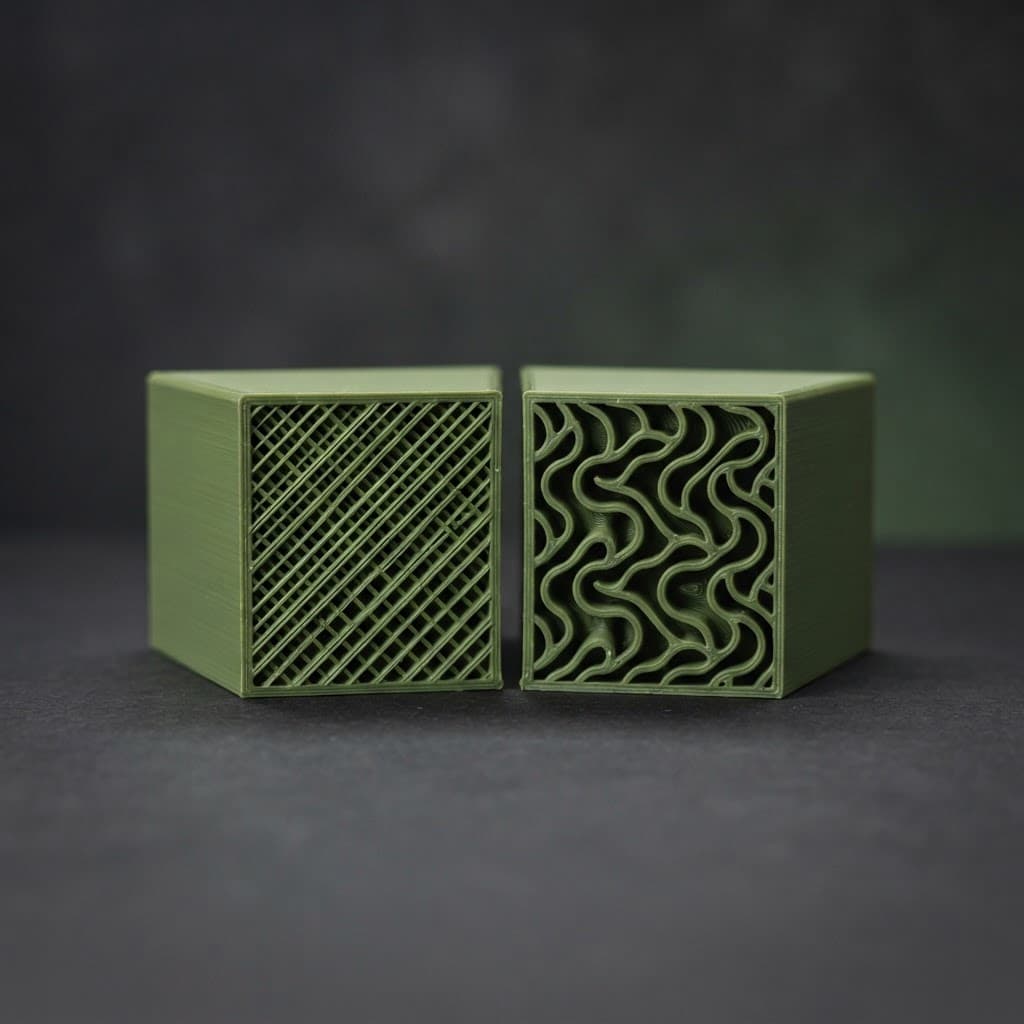
You've just downloaded an STL file, sliced it up, and hit print, but have you ever wondered what's actually going on inside your 3D print? It's not solid plastic all the way through. What fills that space is called infill, and it's one of the most important settings you'll ever tweak.
What Is Infill, Exactly?
When a 3D printer builds an object, it lays down a solid outer shell (also known as the perimeter or walls), the top and bottom layers, and then fills everything in between with a repeating internal pattern. That internal pattern is known as the infill.
Think of it like a waffle. The outside of the waffle is solid and smooth, but the inside is a grid of air pockets. That structure makes it strong, light, and uses less batter than a solid block. Infill works the same way: it gives your print strength and support without wasting filament.
There are two key things about infill that you control:
- Pattern: The shape and design of the internal structure (grid, gyroid, honeycomb)
- Density: How much of the interior is filled in with filament, expressed as a percentage (0% = hollow, 100% = solid)
For most everyday prints, 15–25% density is sufficient. Going beyond that increases weight, filament use, and print time without always improving strength.
Why Does the Pattern Matter?
Not all infill patterns are created equal. The pattern determines:
- How strong the print is in different directions
- How flexible or rigid it feels
- How much filament and time it consumes
- How well it supports the top layers of your print
There are dozens of infill patterns available: honeycomb, lightning, tri-hexagon, gyroid, zigzag, concentric and many more. Among them, two have become the most widely used across all experience levels: Grid and Gyroid. Grid earns its place by being fast, simple, and universally supported, while Gyroid is known for its superior strength-to-weight ratio. Understanding these two will cover the vast majority of prints you'll ever make, and provide you with a solid foundation for exploring other infills later.
Grid Infill: Simple, Fast, and Reliable
What It Looks Like
Grid infill is exactly what it sounds like: a straightforward crosshatch pattern, like graph paper. The printer lays down lines in one direction, then crosses them in the perpendicular direction on the next pass. The result is a series of square cells running through the interior of your print.
Why People Love It
- It's fast. Because the lines are straight and the paths are simple, your printer can move quickly and efficiently. For parts that don't need to be especially strong (think decorative pieces, prototypes and enclosures) grid is a great default.
- It's predictable. Grid infill behaves exactly how you'd expect. Increase the density, and the part gets stronger.
- It works everywhere. Grid is supported by every slicer on the market. Whether you're using Cura, PrusaSlicer, Bambu Studio, or anything else, grid infill will be available and will perform consistently.
Where It Falls Short
Grid infill is strong along the two axes it prints in (let's call them X and Y), but it has a weak diagonal. Apply force at a 45-degree angle, and the square cells don't resist as well. It also doesn't handle forces coming from above (the Z direction) as well as some other patterns.
For simple, non-load-bearing parts, this doesn't matter at all. But if you're printing a bracket, a mechanical part, or something that will be stressed in unpredictable directions, you might want something more versatile.
Gyroid Infill: The Engineering Marvel
What It Looks Like
Gyroid infill is a flowing, wave-like three-dimensional structure that curves continuously through the interior of your print, with no flat lines or sharp corners. It's based on a mathematical structure (triply periodic minimal surface) that repeats itself evenly in all three dimensions, which is what gives it such consistent strength throughout the part. Think of the gyroid as a coral reef.
Why People Love It
- It's strong in every direction. Because the gyroid structure curves through all three axes, it resists forces from any direction equally well. This is called isotropic strength, and it's the gyroid's superpower. Your part won't have a "weak side."
- It's great for flexible filaments. If you're printing with TPU or other flexible materials, gyroid infill allows the part to compress and flex more evenly without collapsing or tearing along a seam. The continuous curves distribute stress beautifully.
- It prints without crossing itself. The gyroid pattern never intersects itself, so the printer can lay down an entire layer without ever crossing a previously printed line. This means fewer blobs, less stringing, and cleaner results, which is especially noticeable at higher speeds.
- It's surprisingly material-efficient. Despite looking complex, gyroid infill uses filament very efficiently relative to the strength it provides. You often get better strength-per-gram than with grid.
Where It Falls Short
- It's slower to print. All those curves mean the printer is constantly changing direction, which limits how fast it can move. On a standard printer, gyroid will take noticeably more time than grid at the same density.
- It can look intimidating. For beginners, the preview in your slicer might look chaotic or wrong. This is normal — the curved, interlocking structure is working as intended, even if it doesn't look immediately familiar.
Grid vs. Gyroid: Which Should You Use?
Here's a simple way to think about it:
| Situation | Recommended Infill |
|---|---|
| Decorative prints, figures, prototypes | Grid |
| Mechanical parts, brackets, clips | Gyroid |
| Flexible filament (TPU, TPE) | Gyroid |
| Printing speed matters more than strength | Grid |
| Maximum strength at lower density | Gyroid |
| Printing on a budget (less filament) | Grid at low density |
In practice, many experienced printers use grid as their everyday default and switch to gyroid when a part needs to perform. That's a solid strategy for almost any situation you'll encounter.
One More Thing: Density Still Matters
Whichever pattern you choose, infill density has a big impact. A 10% gyroid is not necessarily stronger than a 40% grid. As a general starting point:
- 10–20%: Light prints, decorative items, parts that don't need to withstand force
- 20–40%: General purpose; good balance of strength and speed
- 40–60%: Functional parts under moderate load
- More than 60%: High-stress parts; consider whether solid walls might serve you better
The Takeaway
Infill is one of those settings that seems minor until you realise how much it shapes your final print. For most beginners, grid at 15–20% is a perfectly sensible starting point. Once you're ready to level up (especially for prints that need to hold up to real-world use), gyroid at 20–30% is often the smarter choice.
A good place to start: take your next print and try it once with grid and once with gyroid at the same density. Compare the previews in your slicer. The difference in structure is immediately visible, and it makes the trade-offs between the two patterns much easier to understand.
Happy printing!
Next articleThe Essential 3D Printer Maintenance Checklist